
Retro-commissioning (RCx) Basics
- chatengineer

- Jul 3, 2019
- 4 min read
The idea behind retro-commissioning, is the thought that your facility or building isn’t running properly, hasn’t been properly commissioned after construction, the building mechanical systems could be tuned/adjusted to run more efficiently, or you simply want to dive into how effective your systems really are. The idea here is to retrofit and/or change something along the way to increase effectiveness and efficiency of your building.
Usually after a building is re-commissioned, or retro-commissioned, the systems are able to adjust to the climates you’ve set them for. In other words, they act like they’re designed and supposed to work. You’d be surprised how many buildings AREN’T commissioned after construction, dampers aren’t balanced and thermostats are in the wrong place or controlling the wrong zones, etc. There are numerous reasons why you should retro-commission a building, but one thing is for certain, this can be a tedious process, as well as time consuming and complicated. So we’ve tried to put together a short list of blog posts we wrote up to help guide you through each step of the process.
Again, these blog posts below are a culmination of real life experience, research and some company trainings we’ve received.
RCx Checklist:
Walk The Facility – Getting out to the client’s site is a must for retro-commissioning. It’s a direct way to verify if the as-builts as correct, as well as an opportunity to conduct a conditional assessment of equipment components. Checking for rust, corrosion, safety hazards, maintenance logs, temperature set points, talking to tenants, and anything else that can give you perspective around how the building operates will come in handy in the long run. Trust us! But before you head to the site, make sure to accomplish step 2, and be thinking about step 3 as you do so.
Conduct thorough investigation of As-Built drawings – There have been numerous times where the as-builts as not the same as what was installed. There may have been renovations, room designation changes, operational hours shifted, etc. Diving into the as builts along with step 3 below, can really give an overall perspective of what the designer’s intentions were. We recommend either using adobe pdf editor’s highlight feature, or you can choose to go old school and print out the drawings on 11″x17″ and use a normal highlighter. It easiest to interpret drawings when you highlight supply air in one color, return air with another and exhaust air with a third. This will help you to see where the air comes from and where it goes. Take this with you to the site visit, as you might be wandering around aimlessly looking for a FCU or HW valve.
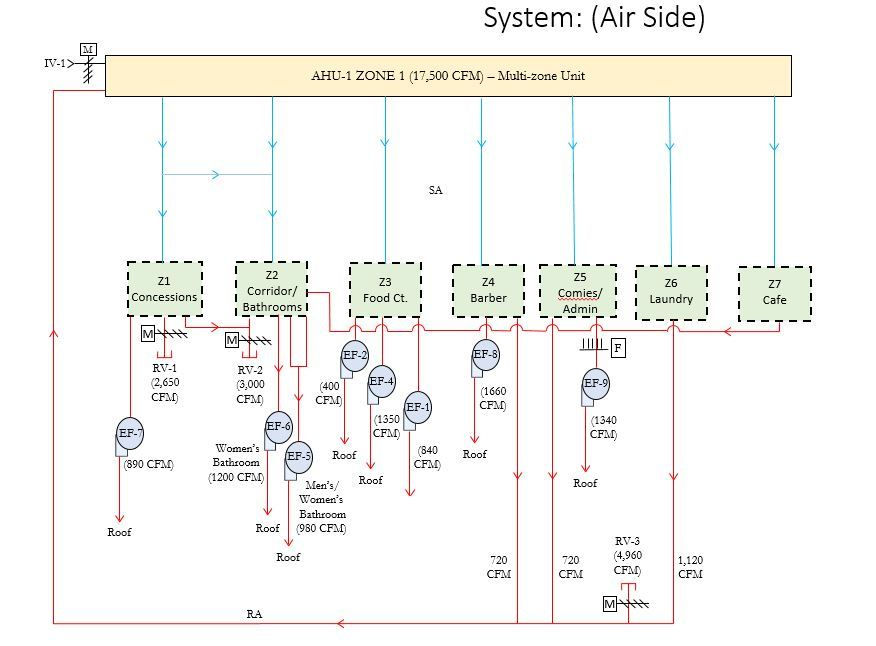
Develop system diagram – This step doubles as easily one of the most important steps in this whole journey, as well as the most time intensive step. We did a whole blog post on how to accomplish this step, as it’s tedious and can sometimes takes weeks to accomplish. But it’s absolutely necessary if you want to fully understand the system that’s installed. Plus, it can double as a nice troubleshooting print out for the mechanical room afterwards. Your maintenance staff will thank you!
Find ways to cut energy/tune system to save energy – We call these low cost/no cost measures and they’re awesome! The idea behind this is to find a solution to a problem (large or small), that requires low cost to no cost (maybe under $100) to accomplish. This can include: changing the speed of a supply fan or motor using a VFD, scheduling your air handlers for optimization, tuning LED’s, etc. See How to Size a Solar PV System Using Geli for more info on renewables as an option for saving energy.
Equipment Inventory List – It helps to start out with a list of every mechanical/large electrical component in the system and their equipment ratings. Note HP, fan speed, pump GPM, voltage and current draw, etc. This will come in handy when troubleshooting errors in system operation later in the RCx process.

RCx Issues & Resolutions List – This is a master tracker that has issues you’ve come across in the RCx process, and what you did to fix them. This will help maintenance staff troubleshoot problems and maintain daily system tasks; as well as any other engineers who touch the system down the line.

RCx Findings List – This list is comprised of set points, broken machinery, scheduling errors, shut valves or anything else you notice that is out of place or could effect the overall system operation. It should be jotted down here and be addressed in the RCx measures list seen next.

Preliminary RCx Measures – This list is an easy way to keep track of ECM’s, savings per ECM and priority of the ECM. This links a few lists into one as an overall measures tracking list, giving you a zoomed out version of how each ECM effects the overall energy savings.

Monitoring Plan – How you plan to monitor or track evolutions performed on your systems is very important, which especially helps maintain organization during confusing and information heavy times while troubleshooting your systems. This helps for both small and large plant orientations.

Write Scope of Work (SOW) – We’ve included this step in the RCx process, because it’s important that the client conveys clearly and effectively, the desired deliverables from the start. The more information you put in the SOW, the better off you are in obtaining the results you desire. However, this can also hinder and stifle design innovation or growth, so be cautious. Take a look at the link provided for more information on, how to write a scope of work.
We hope you all enjoyed our post and please leave feedback if this helped at all with the RCx process! Good luck out there!


Comments